Let’s face it; this holiday season is sure like no other. While the kids have traded in sitting on Santa’s lap for zoom calls and socially distant waves, there is no reason we shouldn’t go into the season and celebrate with just as much enthusiasm as we normally would.
Over the past few weeks, I have talked to many family members and close friends over the phone to discuss some cool and holiday activities. Through those conversations, I found many families in the same position, stuck with nothing to do or without any holiday plans. So what we are stuck in the house, we can still have fun with it!
I have been through many different blogs and social media accounts to search for virtual holiday fun. Looking below, you will come to find that many of these tips and suggestions require little to no money yet still allow you to get most of the benefits you had before, between awesome recipes and holiday activities.
We would love to see how you and your family or loved ones are ringing in the holiday season this year. If you have any cool tips or have found yourself using any of the new and inclusive ones below, please let us know on social using #SharpHome on Instagram, Facebook, and Twitter.
Christmas Light Scavenger Hunt

Growing up, a huge holiday tradition my family and I would embark on would be to drive around the local area for Christmas lights and over-the-top holiday displays. When I was 6, I remember asking my parents why people light up their homes, and the reason I was given was so that Santa Claus could see where he is going.
While the light may serve as navigation for the reindeer, for the rest of us, they serve as a classic holiday staple for the season and always are a joy to look at. Between the themes of the lights and different colors or pieces, it always seems to put a smile on your face.
This year, I’ve noticed many organizations and businesses offer a drive-in light show consisting of all holiday classics for the whole family to enjoy. When I first heard about one happening around the corner from me, I hopped in the car to check it out and wondered how much my nieces and nephews would love it.

Head onto the internet or social media and find some awesome light displays near you. Map them out and create a custom route for you to drive through and set out. While the children (or adults) are in the car, give them this awesome free and printable Christmas Light Scavenger Hunt sheet from “Just What We Eat,” containing common elements for them to keep their eyes out for. The list includes items such as a house with red lights, all the way to a polar bear. This will keep the kids off the tablet and bring out their competitive spirits that I know they love and miss.
To step it up a notch, it may be great to offer some incentive for winning. Whether it be getting an extra holiday cookie or letting them stay up an extra 15 minutes past their bedtime, I am sure you will have lots of excitement and laughs along the way.
If you want to munch along the way on some awesome holiday desserts, aside from the ones listed above, feel free to check out the Holiday Cookie Recipe Roundup for some delicious sweets.
Gluten-Free Gingerbread Cupcake Recipe
It is no secret that I have a sweet tooth, and whenever the holiday season rolls around each year, it becomes a bit stronger. Between looking through social media, holiday catalogs, and commercials on TV, we are all constantly forced to look at all these amazing and delicious desserts (as if it is a bad thing). Lucky for you, this one creation I am about to show you will get you logging off the web and into your kitchen.
When December hit, I felt very festive and began looking for holiday-centric activities to ring in the season. For the past few years, Simply Better Living has been the headquarters of all things tasty, and you are about to see why. This Gluten-Free Gingerbread Cupcake Recipe with cream cheese frosting from Sunkissed Kitchen’s is for sure the go-to this holiday season.
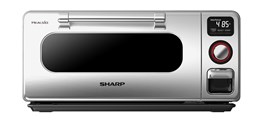
This mindful holiday treat is effortless to create and can be made in your Sharp Superheated Steam Countertop Oven. With no need to preheat the oven and the fact that the total time is 35 minutes, this seems like a match made in heaven and an overall win. So, what are we waiting for?
I’m assuming you are already in your kitchen, ready to go, so go through your cabinets and make your grocery for the essential ingredients. Search for pumpkin puree (6 tablespoons), honey (1/4 cup), strong coffee (3 tablespoons), blackstrap molasses (1 1/2 tablespoons), melted coconut oil (1 1/2 tablespoons), an egg (just 1), cinnamon (1 teaspoon), and some freshly grated nutmeg (1/4 teaspoon).

Feel free also to get together some ground ginger (1/2 teaspoon), baking powder (a teaspoon), baking soda (1/4 teaspoon), salt (1/4 teaspoon), almond flour (3/4 cup), oat flour (6 tablespoons), and arrowroot (2 tablespoons).
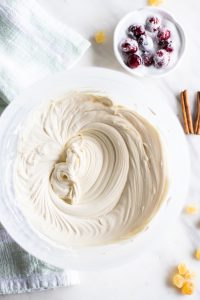
Finally, for the cream cheese frosting, take out some cream cheese (8 oz.) and light-colored honey (1/4 cup). I know that there are quite a few ingredients, but each one will make this creation extra tasty and well worth it. Let’s go through the steps.
- Now that you have all of your ingredients out on the countertop grab a large mixing bowl and place in the pumpkin puree, honey, strong coffee, blackstrap molasses, melted coconut oil, an egg, cinnamon, ground sugar, freshly grated nutmeg, baking powder, baking soda, and salt. Make sure to mix it well and combine it for about two minutes (to make sure you get an authentic taste in each bite!)
- Once mixed, add in the almond flour, oat flour, and arrowroot. Fold it in until blended.
- Next, grab a muffin pan and line it up with cupcake papers. Then divide the newly mixed batter evenly into each cupcake liner.
- Place the cupcake tray in the Sharp Superheated Steam Countertop Oven and set the Bake/Reheat at 350 degrees for about 16 minutes.
- While they are in the oven baking, let’s move onto the frosting. Take out the cream cheese and set it to room temperature, using a hand mixer to beat in the honey. If you find the frosting too soft, put it in the refrigerator for a bit.
- Finally, ice the cupcakes and decorate them using your personal decorative holiday style!
Getting Together (Virtually) with Loved Ones

One of the benefits of having social media over the years is that you get a flashback or a recap of a post or picture that same day over the previous years. Over the past few weeks, I began to receive flashbacks and nostalgic memories with friends celebrating Friendsgiving’s, secret Santa’s, holiday dinners, and memorable office Christmas parties.
Sure, virtual happy hours and talking with our loved ones on the phone now and then is cherishable, but nothing beats a night out with your friends to celebrate each other and ring in the holiday. Since social distancing guidelines worldwide are tightening up, and we are still behind our computer screens, that doesn’t mean we can’t have a little fun and set up a virtual holiday party.
I know you are thinking about how we can execute this and what it entails but follow a few of these tips from “Team Building” to make it extra special. While there are many great tips, here are a few of my favorites.

The first one was to send a physical invitation to everyone’s home address. One thing I can tell you is that ever since the work from home and virtual would begin to take over, my inbox and digital calendars become more and more overwhelmed each day. A nice decorative and festive printed invitation showing a time, date, and place to find the link will give a sense of normalcy. Plus, everyone always likes to receive a piece of mail addressed to them in a special envelope (especially if it is not a bill. If this is more of a personal setting, feel free to note on the invitation that people can pour a drink so you and all of your (virtual) party guests can sit back and relax.
This next tip was also one of my favorites as it involved a conversation piece and an icebreaker. Many virtual meeting software and conference systems allow you to change your background, but many tend to either leave it blank or blur it out. The cool idea is to change it to a favorite holiday memory (or any memory with someone on the call). This allows everyone to remanence and think upon old times and give everyone a laugh. Sounds fun, right?
Chocolate Caramel Pretzel Bars

It may not be specifically designated as a holiday dessert, but the taste and the amazing ingredients were and are just too good not to include. If you wonder what I am talking about, it is this amazing recipe from “One Little Project” calling for chocolate caramel pretzel bars. I know; I just heard my stomach growl too.
This recipe has been dubbed as a “quick, easy, and yummy treat,” and I couldn’t agree more. The sweet and salty taste in each bite makes them so easy to pop one or two in your mouth (or three, or four). Aside from the taste, one of the interesting things I found about this recipe is the production process and preparation. I guarantee you will come to find it unique and satisfying, something you and the family will love. I know you are curious and want to get right to it, so let’s gather what we need.

Either search through your cabinets or mask up and go to the grocery store to pick up a few ingredients. To make about 36 servings, you will need mini pretzel twists (about 4 cups), a cup of butter, a cup of brown packed sugar, and 2 cups of chocolate chips. If you are really feeling hungry, keep out a few extra chocolate chips to munch on and set that pile aside (shh, don’t tell anyone!)
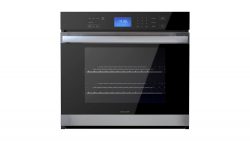
- To start, you will want to preheat your Sharp Stainless Steel European Convection Built-In Single Wall Oven to 325 degrees F. Then line a baking sheet using aluminum foil and spray some non-stick cooking spray on there.
- Next, single-handedly place each pretzel twist onto the baking sheet in a single layer so that they touch each other side by side. You should have enough to do the whole tray.
- Grab a small pot and melt the butter and sugar over medium-low. Once it is brought to a boil, let it continue for about 3 minutes and continue to stir it. Pour the new mixture over the pretzels (it will make sense in a bit).
- Place the tray with the boiled butter and sugar in the oven and back it at 325 degrees for approximately 8-10 minutes.
- Once the newly formed caramel is bubbling over the sheet, please remove it from the oven and sprinkle on some chocolate chips (yummy!) Place it back in the oven for 1-2 minutes to soften the chips a bit.
- Next, spread the melted chocolate everywhere using a spatula, then place it in the freezer for about 30 minutes.
- Finally (the best part), remove the pretzels from the baking sheet. Peel off the foil, cut them up, and enjoy!
Mason Jar Holiday Gifts

While many of these tips, recipes, and activities are fun and will put you in a festive mood to ring in the holidays right, this is the season and giving, and just because times are different, that does not mean we can forget about those we love and not show our appreciation for them.
While working from home takes up my week Monday through Friday, I tend to find myself something on the weekends. Stores are crowded, and my online shopping addiction needs to be cured, so I was looking for something that could be useful, give me something to do, and make someone happy.
Upon my searches for awesome holiday activities at home, these amazing creations highlighted from “The Crazy Craft Lady” calling for Mason Jar Christmas Gifts. The best part about this is that there is not one common theme, and through the link, I was able to get inspiration for many different inspired themes. In fact, over 30 of them. Let me walk you through some of my favorites.

I enjoyed the first one from “A Night Owl Blog,” specifically talking about a S’mores Mason Jar Gift. The decorative mason jar with the red and green labels included are the holiday store essentials. This includes mini marshmallows, holiday-themed M&M’s, and tiny Grahams (cereal could work). Toss and mix them and place them in a jar. Top it off with red and green papers acting as tiny cards, tying around the mason jar with a red string. One of your loved ones is going to love it!
Are you an artist or enjoy a paintbrush? Another creation highlighted is these Christmas sweater mason jars from “It All Started with Paint.” This is your opportunity to have fun. Find some of your favorite Christmas sweater patterns online and mimic them using holiday colors.
The best practice to follow is to get some primer paint and use it for a first coat. Then, find your favorite acrylic paint and go at it. Red and Green paint will really make the Christmas theme pop!
Finally, once you have let it dry, fill it with some of yours, or the person receiving the gifts, favorite candies. This will surely give them the holiday feel, as well as some of their favorite treats. Happy giving!

