One of the most important parts of preparing a delicious meal starts long before the cooking and prep work. Having a cooking space designed with functionality and beauty in mind is the foundation for a successful (and yummy) meal. Kitchen appliances should cater to your culinary needs and complement your design aesthetic. Sharp Appliances offer modern and elegant products to elevate your cooking game while being a beautiful addition to your dream kitchen.
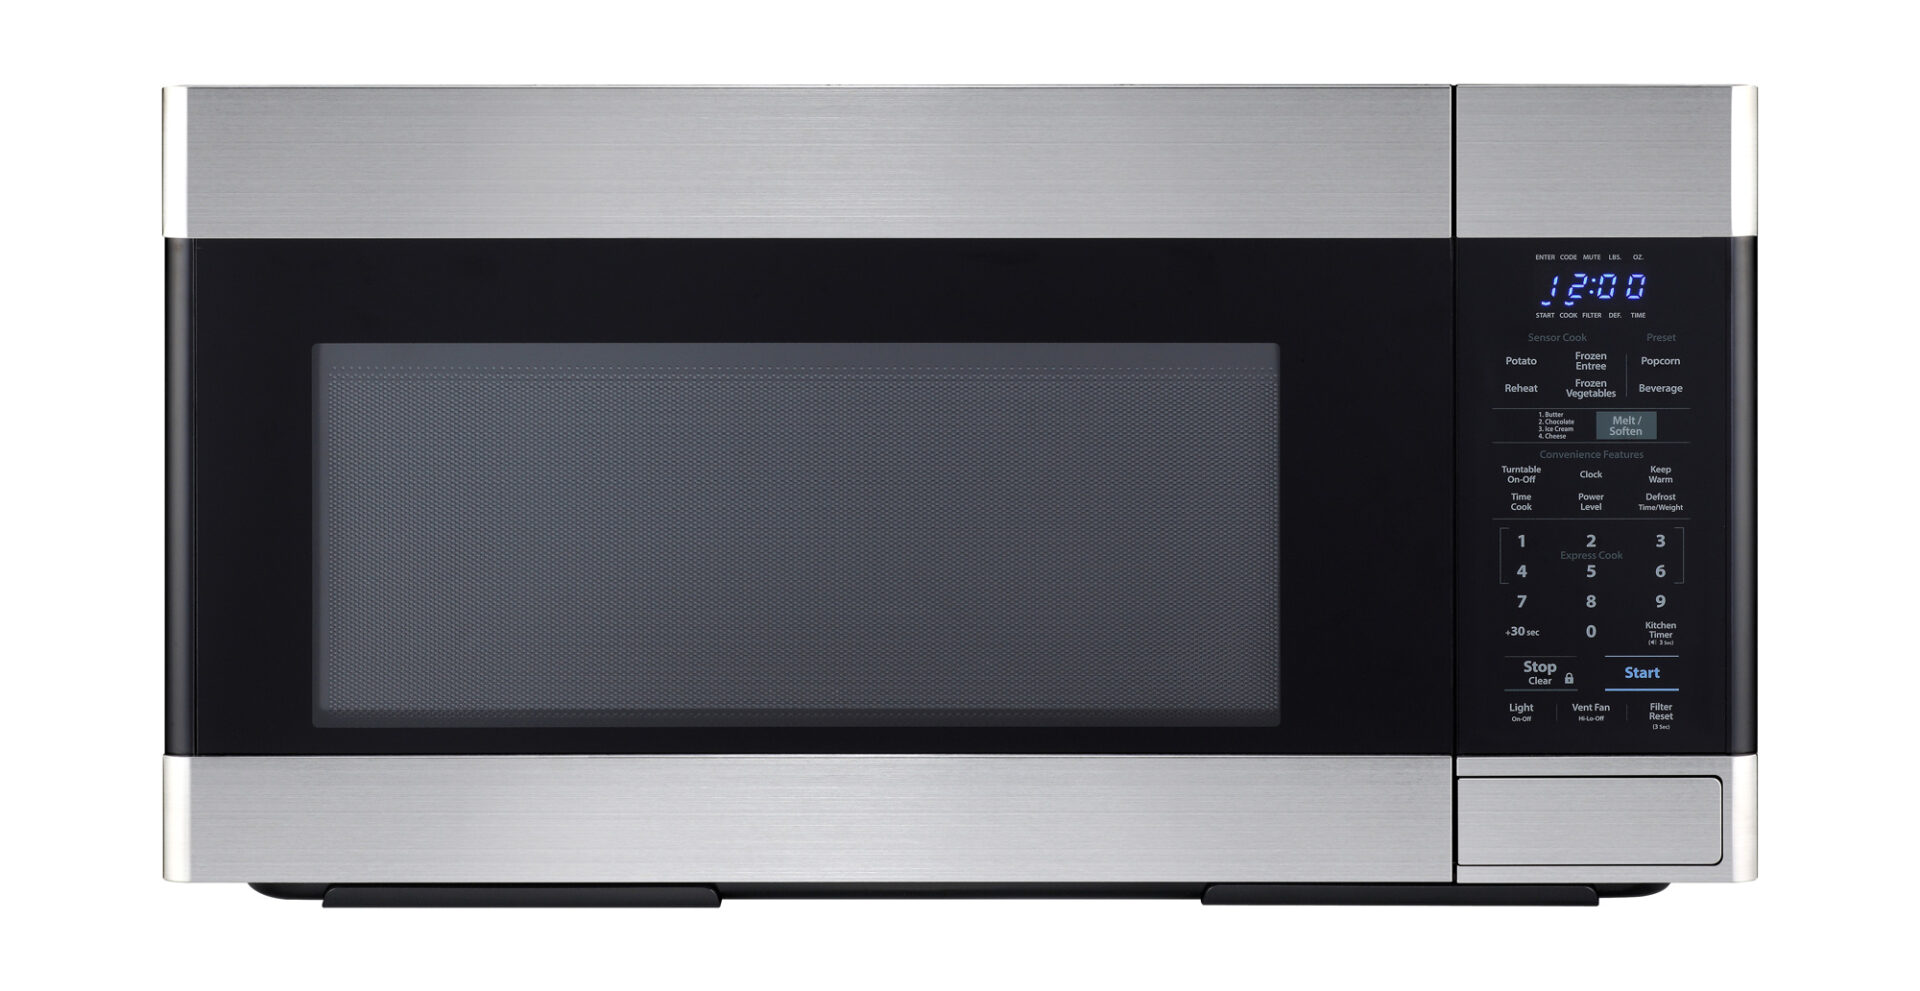
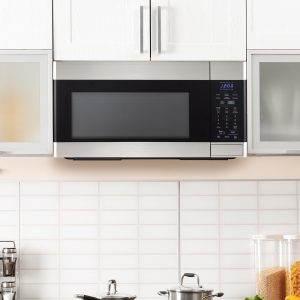
Over-the-Range Microwave Ovens are a popular choice in cooking spaces as they offer an elegant solution for the space-conscious kitchen. 1Their easy-fitting designs free up valuable counter space so that you have more room to prepare the meals you love. Above stove microwave oven installation is simple, offering flexibility for new homes or remodeling projects. Whether you have just purchased a microwave, are redesigning your kitchen, or are still in the process of deciding what microwave is right for you, this guide will provide you with helpful step-by-step installation instructions.
You can replace a microwave oven yourself with guidance Fellow DIY-ers gather around as we dive into the basics of replacing a Sharp Over-the-Range Microwave Oven! This is your complete guide to installing
For more details regarding a specific Sharp Over-the-Range Microwave Oven model, make sure to visit our website for more detailed information.
We would love to see the process as you update your kitchen appliances and living spaces. Share your before and afters (and the in-betweens) with us on Facebook, Twitter, Instagram, and TikTok by tagging us and using #SharpHome!

Where Do You Want to Install Your Over-the-Range Microwave?
You likely have a specific spot in mind for your microwave – such as over your cooktop. Before starting the installation process, you should confirm that your wall construction and counter/cabinet/kitchen space fits the requirements.
Here is a list of the exact requirements needed for a Sharp Over-the-Range Microwave.
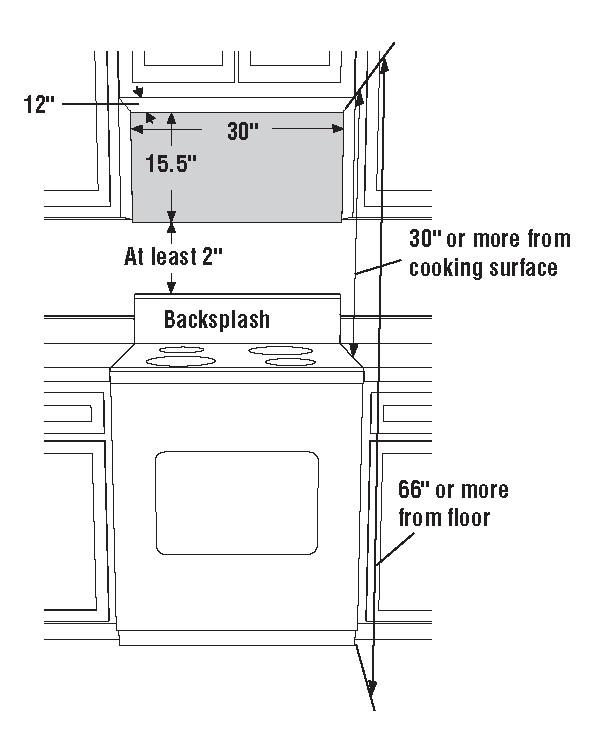
- The microwave must be mounted on a flat wall that is:
- 66 inches or more above the floor
- 30 inches or more above the range/cooking surface
- 2 inches or more above the backsplash
- The space for the microwave must be:
- 12 inches in depth
- 30 inches in width
- 5 inches in height
- The microwave must be mounted on a wall that is a minimum of 2-inch x 4-inch wood studding and 3/8-inch or more — thick drywall or plaster/lath.
- The wall must be capable of supporting 110 lbs.
If your space fulfills all the above requirements, you can officially start the installation process.
Preparing to Install Your Over-the-Range Microwave
Now that you’ve determined your space can fit and support an over-the-range microwave, you need to prep the area. Prepping the area is very important. It is the foundation for your appliance and includes preparing the wall, connecting the electricity, and installing the hood exhaust duct.
The following instructions are very detailed but easy to accomplish. We recommend that if you do not feel confident in your ability to connect the electricity or feel that the electricity in its current state does not meet local or national standards, please contact a certified professional.
Prepping the Space to Mount Your Microwave
The first thing you will need to do is identify where the studs are in your wall. You can do this with a stud finder tool or by using a hammer to tap across the surface of the wall lightly. Continue tapping until you hear a solid sound — that means you have found the stud.
The unit should be attached to a minimum of a 2-inch x 4-inch wall stud. Find the center of the stud. This can be done by probing the wall with a small nail to identify the stud’s edges. Place a pencil mark halfway between the edges to identify the center.
Tip: the center of adjacent studs will normally be 16 inches – 24 inches to either side of this mark.
Grounding Your Microwave
Before tackling any of the electrical tasks, please make sure your appliance is grounded. In an electrical short circuit, grounding reduces the risk of electric shock by providing an escape wire for the electric current. You must confirm this before moving forward. Your appliance should be plugged into a wall socket that is properly installed and grounded in accordance with national and local code requirements.
Warning: improper use of the grounding plug can result in a risk of electric shock.
Your microwave is equipped with a 3-prong grounding plug. Do not, under any circumstances, cut or remove the grounding pin from the plug.
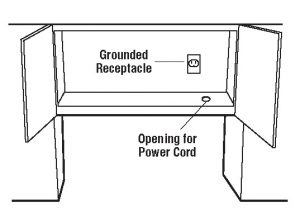
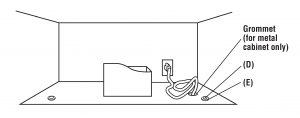
Connect your power supply cord to the separate 120 Volt AC, 60 Hz, 15 Amp, or more branch circuit, single grounded receptacle. This should be located inside the cabinet directly above the mounting location.
Installing the Hood Exhaust Duct
Is your hood vented to the outside? If so, a hood exhaust duct is required.
Tip: all ductwork must be metal; you cannot use plastic.
To start this process, you will need to confirm that all connections are secure. Please read the following:
- Exhaust Connection: The hood exhaust is designed to connect to a standard 31/4-inch x 10-inch rectangular duct. If a round duct is required, a rectangular-to-round adapter must be used.
- Rear Exhaust: If you are using rear or horizontal exhaust, you will need to align the exhaust with the studs’ space.
- Maximum Duct Length: To achieve satisfactory air movement, you should not exceed a total duct length of 140 feet whether you are using a 3 1/4-inch x 10 inch rectangular or 6-inch diameter round duct.
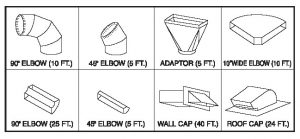
If possible, a straight duct is best. Elbow, adapters, wall, and roof caps create additional airflow resistance. If you are unable to have a straight duct, you will need to calculate the total length, add the equivalent lengths of all transitions and adaptors, plus the length of all straight duct sections. Doing this will allow you to calculate airflow resistance. This should total less than 140 feet.
How to Install Your Over-the-Range Microwave
Now that you have prepped the space for your new appliance, it is time to start the installation process. The installation process includes unboxing your microwave, connecting the ventilation, mounting the scale plate, and finally, mounting your microwave. In order to complete this installation, you will need the following tools:
- Phillips screwdriver
- Measuring tape
- Drill
- ½-inch, 5/8-inch, and 3/32-inch drill bits
- 1-1/2-inch wood bit or metal hole cutter (if a metal cabinet is used)
- Saw to cut exhaust opening (if needed)
- Scissors
- Pencil
- Tape
- Protective drop cloth for product and range
- Protective eyewear
You will also use the items listed below, which are included in the appliance you purchased.
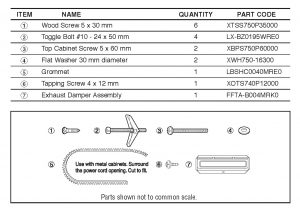
Preparing Your Microwave
Unbox your microwave. Fully inspect the unit to confirm there are not any dents, scratches, or cracks. Open the microwave to confirm that there is not a misaligned or bent door, damaged door seal or broken/loose door hinge. It should be in pristine condition. If it is not, contact the retailer you purchased the microwave from or contact a Sharp authorized service center. You do not want to install a previously damaged microwave. This could cause various problems, from an inability to function to inflicting damage on the surrounding surfaces.
If the unit you purchased has a mounting plate: rest the oven on its side. Remove the two screws that secure the mounting plate to the rear side of the microwave. Remove the mounting plate. The two screws can be discarded.
Connecting the Ventilation System to Your Microwave
Your microwave can attach to three different types of hood ventilation systems:
- Recirculating: non-vented, ductless operations
- Horizontal exhaust: outside ventilation
- Vertical exhaust: outside ventilation
Follow the directions below based on the type of ventilation system you will be using.
Recirculating
If you have a recirculating system, that means that it is non-vented and ductless. These units are typically preassembled for recirculating and require no further installation. See owner’s manual for care, filter maintenance, and additional information.
Horizontal Exhaust
If you have a horizontal exhaust, this means you are working with outside ventilation. Follow these instructions:
1. Remove the screws from the fan cover bracket. You need to save these screws.
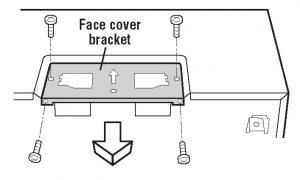
2. Remove the fan cover bracket.
3. Carefully lift the hood fan unit and slip the wire out of the cavity. Do not stretch, pull, or overextend these wires, as it could cause damage.
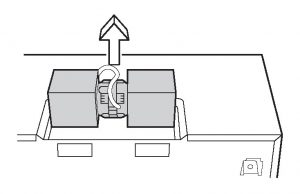
4. Rotate the hood fan unit 180° so that the fan blade openings face the back of the microwave. You will need to lift the wire over the hood fan unit into the microwave.
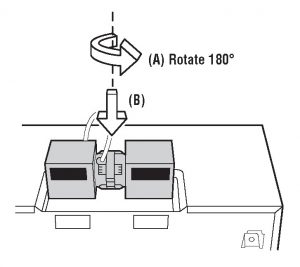
5. Replace the hood fan unit with the microwave. Be careful not to pinch the wire.
6. Place the wire back into the cavity.
7. Replace the fan cover bracket. You will need to confirm that the fan blades are visible through the rear opening in the microwave. This must be done before moving forward.
8. Attach the fan cover bracket to the microwave with the screws you removed in step 1. The hood should not be rotated for horizontal exhaust operation.
9. Attach the exhaust damper assembly to the mounting plate’s back by sliding it into the slits.
10. Use screws to tighten into place.
Vertical Exhaust
If you have a vertical exhaust, this means you are working with outside ventilation. Follow these instructions:
1. Remove the screws from the fan cover bracket. You need to save these screws.
2. Remove the fan cover bracket.
3. Carefully lift the hood fan unit and slip the wire out of the cavity. Do not stretch, pull, or overextend these wires, as it could cause damage.
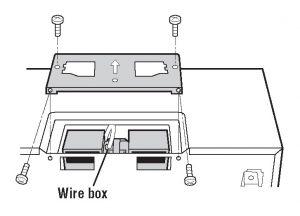
4. Rotate the hood fan unit 90° so that the fan blade openings are facing the top of the oven.
5. Place the hood fan unit into the oven. Be careful not to pinch the lead wire between the inner bracket and the hood fan unit. Put the lead wire into the wire box.
6. Attach the fan cover bracket to the unit with the screws you removed in step 1. The hood should not be rotated for vertical exhaust operation.
7. Attach the exhaust damper assembly to the fan cover by sliding it into the slits.
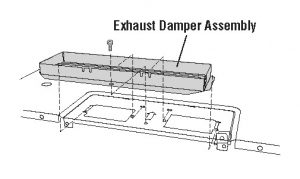
8. Use screws to tighten it into place.
Microwave Installation – Mounting Scale Plate
Before installing your microwave mounting scale plate, please confirm that your space meets all the requirements listed in the “Where Do You Want to Install Your Over-the-Range Microwave?” section above.
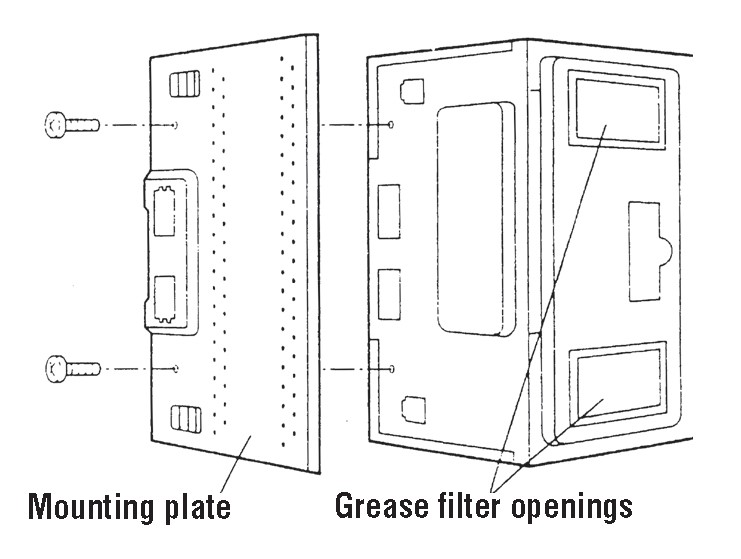
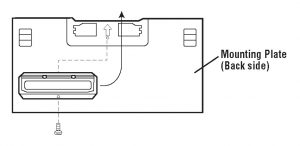
First, use wood screws to attach the mounting plate to the stud(s). Next, use toggle bolts to attach the mounting plate through the holes and attach the toggle nuts.
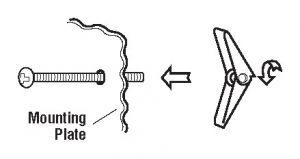
It would be best if you positioned the mounting plate with the toggle bolts attached to the wall. Insert toggle nuts and bolts through the holes in the wall with the toggle nuts closed. Use the wood screws to attach the mounting plate to the stud(s).
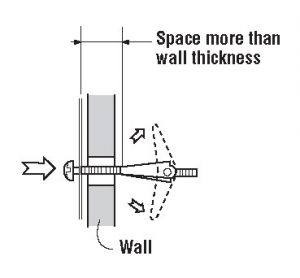
Tip: Before insertion, be sure you leave a space more than the wall’s thickness between the Mounting Plate and the end of each of the toggle nuts (in the closed position). If you do not leave enough space, the toggle nut will not open on the other side of the wall. Once a toggle nut opens, it cannot be withdrawn from the hole; therefore, make sure all of the toggles are in the correct position before insertion.
Align the mounting plate carefully and hold it in position while tightening toggle bolts. Pull toggle bolt toward you and turn clockwise to tighten.

Microwave Installation – Mounting Oven to the Wall
Note: this does not apply to the Sharp Microwave Model R-1881LSY.
For this final step, two people are recommended to attach the microwave to the mounting plate.
1. Carefully place the microwave on top of the range.
Tip: It is recommended that you place a piece of cardboard or a towel/drop cloth between the two units to prevent scratching or damage.
2. Slide the unit toward the back of the range until it stops. Align the lower back edge of the microwave with the mounting plate, then thread the power supply cord through the hole made in the bottom of the top cabinet.
3. Hang the oven on the lower edge of the mounting plate, then rotate the unit upward. Take care that the power cord can clear the edge of the hole as the oven is rotated upward.
Tip: In the case of a non-recessed bottom in the top cabinet, the hole for the cord may need to be enlarged.
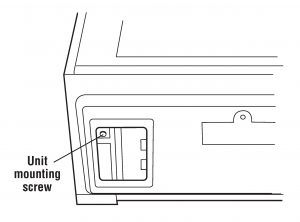
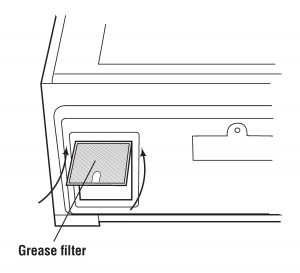
4. Tighten the two-unit mounting screws located in the grease filter openings. Next, you will need to install the grease filters by fitting them into the opening. Push back and up into place.
5. Use the screws and washers provided to attach the unit to the top cabinet.
6. Make a bundle of the power supply cord and place it inside the cabinet.
7. Remove all packing material from the microwave.
8. Plug in the power cord.
Start Using Your New Over-the-Range Microwave
Congratulations — you’ve successfully completed the over-the-range microwave installation process! We recommend that all new users read the operations manual before using it. We hope you love your new microwave!