It is no trick that these recipes sure are a treat!
Are you struggling to find festive treats to make your little ones this Halloween? If your answer to this question is, “Yes!”, then we are here to help! As Halloween quickly approaches, activate your taste buds by experiencing fun, festive treats! Each treat is a quick to create and quickly creates a festive mood, too!
Let us help you create adorable and festive snacks that have never been easier! These snacks will certainly be a hit at any Halloween party.
Spooky Spider Oreo Truffles
Property of Chelsea’s Messy Apron
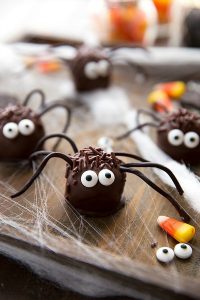
We only have a few more days to be in Halloween-mode before the turkeys take over! These treats from Chelsea’s Messy Apron can help to get you in the groove before it’s too late. I bet you never thought a spider could look this cute until now. I know I didn’t! If you are willing to clean up the excess sprinkles and eyeballs, then get your kids involved in the process! Let them enjoy creating these spiders and adding the eyeballs and sprinkles to put their own twist on this creation.
Ingredients:
- 1 package (16 ounces) OREO cookies divided
- 1 package (8 ounces) full-fat cream cheese at room temperature
- 2 2/3 cup chocolate chips (recommended milk chocolate)
- ¾ teaspoons vegetable oil
Spider Decorations:
- 96 candy eyeballs
- 1/3 cup brown sprinkles
- Thin black licorice
Turn the OREO’s into crumbs with a blender, food processor, or simply pounding on them in a plastic bag. Combine the cream cheese and Oreos by beating them together so that they blend. Roll 1-inch balls from the mixture. It should yield about 48. Place in freezer.
In a microwave-safe bowl, combine the chocolate chips and vegetable oil. Then, microwave in a Sharp Carousel Countertop Microwave Oven in intervals of 20 seconds. In-between intervals, make sure to stir the chocolate for about 15 seconds. Repeat this process until the chocolate is fully melted. Then, submerge the frozen balls in the melted chocolate, and place them on a parchment paper covered tray. Quickly, have your kids add brown sprinkles to the top of the balls, and then add the eyes! Lastly, make sure the licorice is cut into pieces, and have your children press the licorice into the balls while the chocolate is still melted to create the legs of the spider. They can get creative and add as many legs as they want. Once the chocolate is hardened, these delicious, adorable treats are ready to be eaten! You can put them in the refrigerator to speed up the cooling process. I bet you could never say you have eaten a spider before one of these creepy, crawly treats!
Pumpkin Krispy Treats

Property of Yummy Healthy Easy
Personally, like many others, I am a huge fan of all things pumpkin in the Fall! Anything that is pumpkin flavored or decorated as a pumpkin tends to catch my eye! Thankfully, Yummy Healthy Easy offers a pumpkin Rice Krispy recipe that combines two of my favorite things, Rice Krispy treats and pumpkins, into a delicious outcome for everyone to enjoy! The preparation is very simple and making this recipe could be a fun activity to do and enjoy with the kids! I know that I will be making them for my next festive party. These treats can be created with the following ingredients:
Property of Yummy Healthy Easy
- 3 tbsp. butter
- ½ tsp. Vanilla extract
- Red & yellow food coloring or orange gel coloring
- 5-1/2 cups mini marshmallows
- 6 cups crispy rice cereal
- Mini tootsie rolls
- Candy for decorations: M&M’s, candy corn, etc.
To prepare, start by melting the butter either on medium heat or in a Sharp Carousel Countertop Microwave Oven. Mix together the vanilla extract, marshmallows, and butter in a bowl until they are all melted together. Then add food coloring until desired orange color is reached. Lastly, combine the cereal with the melted ingredients. Let the bowl sit and cool enough to handle, but not for too long to avoid having the mixture harden.
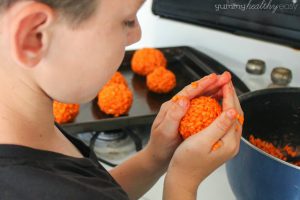
Next, use cooking spray to coat your hands so you can roll the mix into balls to create the look of the pumpkin. It should make about nine pumpkins. To make more pumpkins, roll the ingredients into smaller balls. Then stick an unwrapped tootsie roll into the top of the pumpkin. Add candy for the eyes and nose, using frosting to adhere. Your tasty pumpkin treats are now ready to be enjoyed!
Ghostly Chocolate Covered Strawberries
Chocolate covered strawberries are a sweet snack, and they are hard for anyone to resist. Preparing them in your kitchen is an affordable alternative to buying expensive chocolate covered strawberries from the store. When you go to collect your candy at the grocery store for trick or treaters this Halloween, just add these four ingredients to your cart for a quick holiday treat. The simple preparation of this cute and spooky snack, from Yummy Healthy, can help to save a lot of time. These treats can be made in under ten minutes from start to finish and are gluten free, so more children can enjoy them!
Property of Yummy Healthy Easy
Ingredients:
- Strawberries
- Candiquik white chocolate
- Candy eyes
- Wax or parchment paper
Start off by melting the Candiquik chocolate in a Sharp Easy Wave Open Microwave Oven Drawer for just one minute. Make sure to stir the chocolate well, and add fifteen second intervals, if necessary, until the chocolate is fully melted. Then, line a sheet pan with parchment or wax paper. Once the prep work is finished, you are ready to dip the strawberries!
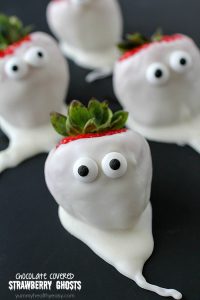
Simply dip the strawberry into the white chocolate, and let the chocolate drip from the strawberry as you lay them onto the wax paper. Allowing the chocolate to drip will create the ghost’s “tail.” Then add two of the candy eyes on the front of the strawberry to create a cute face while the chocolate is still melted. Repeat this process until you finish your desired amount of strawberries. Then place the tray of chocolate covered strawberries into the fridge to let the chocolate harden. Serve and enjoy.
Can’t Forget about the Adults!
Looking for a tasty Fall treat that requires a little less decorating for the adults? Try out these simple pumpkin swirl chocolate brownie recipe from The Comfort of Cooking! While the kids are busy snacking on some of the fun treats mentioned above, make sure there is something festive offered for the adults! The creamy pumpkin swirl takes a typical chocolate brownie from being delicious to melting in your mouth. I am sure this late in October you have already tried a decent amount of yummy pumpkin flavored treats, but nothing like this match made in heaven! For the love of ooey-gooey, fluffy soft pumpkin and chocolate deliciousness, you must make these brownies. Snacking on some of these sinfully good treats can be the highlight to anyone’s day! With a couple simple ingredients, it can be yours too!
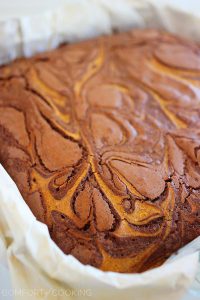
The Property of The Comfort of Cooking
Ingredients for pumpkin swirl filling:
- 3 oz. cream cheese, softened
- ½ cup canned pumpkin puree (not pumpkin pie filling)
- 1 large egg
- 3 tablespoons sugar
- 1 teaspoon ground cinnamon
- ¼ teaspoon ground nutmeg
Ingredients for brownies:
- 1 (18 oz.) box brownie mix (recommended Betty Crocker Fudge Brownies)
- Oil, water, and eggs as called for on box
Heat your Sharp European Convection Built-in Wall Oven to 350 degrees Fahrenheit. Prepare the brownie mix as stated on the box. In a bowl, mix all the pumpkin swirl filling ingredients until the combination is smooth. This can be done with either a wooden spoon or an electric mixer. When both mixes are done, pour the brownie mix into a pan, putting the pumpkin swirl filling in the middle. Then use a knife and stir the ingredients in circles to create the “marble effect” of pumpkin swirl. Bake on the upper-element for 45 to 50 minutes or until a toothpick comes out almost clean. Let your new masterpiece cool, and then cut into squares. You will yield about 16 brownies. At the slight chance that these delicious brownies are not all finished in one sitting, they can be stored by covering in the refrigerator for up to 4 days.
Haunted Mindful Green Zombie Banana French Toast
This recipe from Babble keeps breakfast for your family mindful and vegan while adding a little bit of the Halloween charm to start off your children’s day! In addition, this recipe is a great substitute to your usual breakfast to make starting the day a little more fun while remaining mindful.
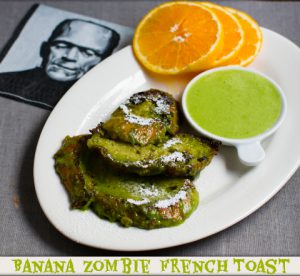
Property of Babble
Ingredients:
- 8 slices of day-old bread
- Zombie banana mixture:
- 1 ½ bananas, very ripe
- ½-1 cup non-dairy milk (almond or soy work best)
- 1 tsp maple or agave syrup
- A few dashes of cinnamon
- 1 handful baby spinach
- 1-2 tbsp earth balance buttery spread (to cook)
- Over top: powdered sugar, organic.
Start by using a blender and combining all the ingredients in the Zombie banana mixture. When done, it should be green and smooth. Next, place the slices of bread into the banana mixture, and turn until both sides are well covered. Then, generously spray the broiling pan that came with your Sharp Superheated Steam Countertop Oven with the nonstick cooking spray, placing the slices of covered bread onto the pan.
Place the broiling pan into your Sharp Superheated Steam Countertop Oven. Turn on the Bake function and set to 375 degrees Fahrenheit. The Super Steam can fit up to 9 slices of toast at a time, so you will be able to cook them all at once. Cook for 20 minutes or until golden brown and crispy. You no longer need to wait for your oven to preheat, when your stomach is growling in the morning with the Super Steam. Pre-heating is not needed, so don’t hesitate to start cooking this spooky meal right away! This unique way of cooking will allow your green zombie banana french toast to stay soft and mouthwatering on the inside, but crispy and brown on the outside. You can add an extra drizzle of green liquid about a minute before removing from the pan to leave a nice green pop of color on the surface. Then sprinkle powdered sugar on top and enjoy this mindful, delicious, and festive start to the day!


